2. Authentication
Along with its goal to provide the right endpoint that will give customers information about their tires, the Tire Information Service aims at offering a single identification solution shared by every tire manufacturer. Keep in mind that this Authentication is optional when a user only requires free and public data about a tire. All GDSO members involved in the TIS agreed on a list of information that can be publicly shared on any tire. As long as a customer does not need information outside of this public core set of data, there is no need for authentication before going to Step 3.
However, the Tire Information Service is also built to give more than the agreed public information. Whenever customers require additional data, they may ask manufacturers to share private data through the TIS. Agreements related to private data, have to be made between a customer and each tire maker he/she would like to work with. GDSO is not involved in those commercial offers or contracts. However, the TIS provides a single point of identification that will avoid a customer the creation of several accounts in each tire manufacturer’s system. GDSO authentication system will provide to its authorized users an identification token that can be passed to any manufacturer’s API. Having such a token will become mandatory for any customer who would like to get additional private data through the TIS. The process to authenticate and obtain an Id token is described in the steps below.
2.1. Prerequisite
In order to execute this step, you will need a user declared by GDSO at the TIS level. It means you have to request an access to GDSO organization which will provide you a username and password, once your demand is processed
Link to User registration process
2.2. Get an identification token
2.2.1. Solution 1: Use Open Id connect
Open Id Connect (OIDC) is a standard based on Oauth2. You may find official documentation on:
OpenId standard provides different solutions for users to identify themselves toward another system. The two following flows are recommended for browser-based identification.
If you need some client credentials : client ID and/or client secret (depending on the OpenID method implemented), you may
address a request by mail to info@gdso.org.
2.2.1.1 Open Id – Implicit flow
Note: The implicit flow method is possible in a browser environment. Although it is easier to implement than the ‘Authorization code flow’ (presented in the next part), it also carries more security risks. That is why it only delivers a temporary access token and no refresh token.
Process: To receive an identification token, the application (client) or user will have to make an authentication request to the Amazon Cognito server used by the TIS.
This request requires:
- Username and password (obtained in step 2.1)
- Client Id (see Tip in 2.2.1 if you need to request a client ID)
- A callback URL for your application
Example:
- First you can make an authentication request to the following URL (see Annex 1 for Cognito URL on all environments). It will redirect to the Tire Information Service login page.
GET https://fuqzxw2k75c49t2fdn.auth.eu-central-1.amazoncognito.com/authorize?response_type=token&state=anything&client_id=3661gkmsqil29qtb24rvq3o4tb&scope=openid&redirect_uri=https://www.postman.com/oauth2/callback

Parameters:
- In green --> Cognito authorization URL
- In purple --> Response_type=token
- In yellow --> Client Id (see Annex 1)
- In Blue --> Your callback URL
This request shall be made with your credentials in the body:
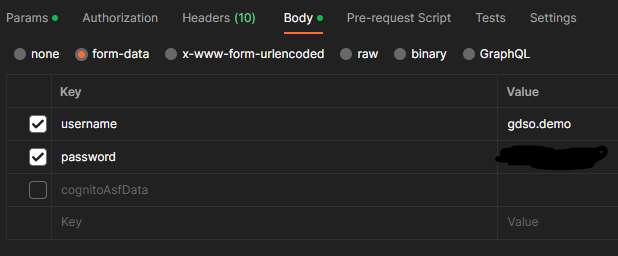
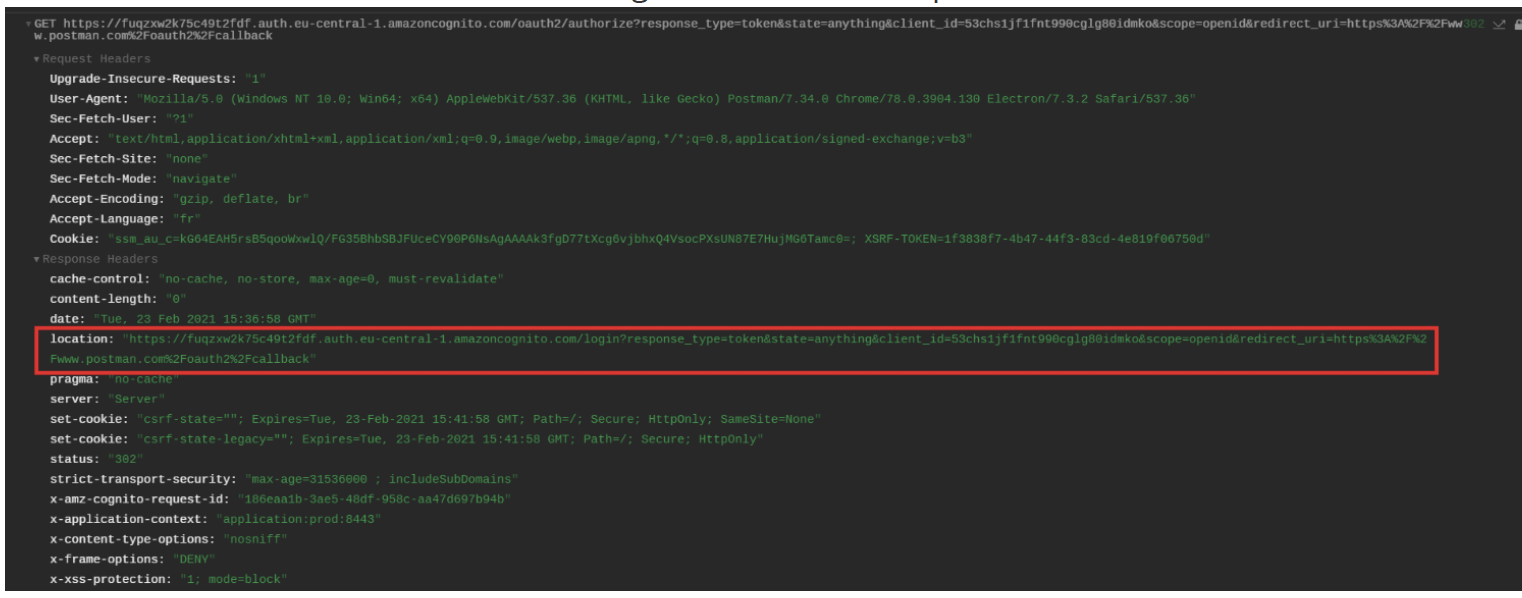
You will receive a redirection toward the login service in the response’s header (in red below):
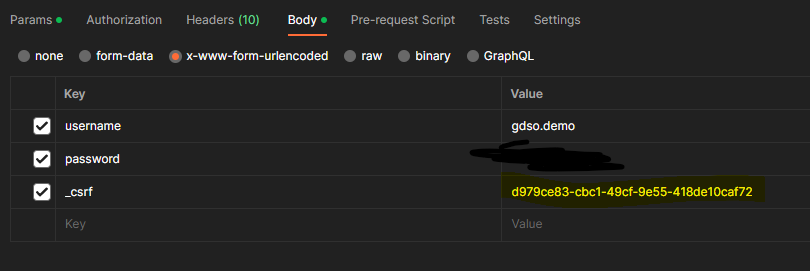
In the answer body, you have to get also the "_csrf" value :

- Validating the credentials will trigger a login request and send back an Id Token and an Access Token to your callback URL. ClientId is in the request’s header, credentials are in the request’s body. (Note that in theory, the two previous steps aim at leading you to this request).
POST https://fuqzxw2k75c49t2fdn.auth.eu-central-1.amazoncognito.com/login?
response_type=token&state=anything&client_id=3661gkmsqil29qtb24rvq3o4tb&scope=openid&re
direct_uri=https%3A%2F%2Fwww.myapplication.com%2Foauth2%2Fcallback

Body:
- username: "myLogin"
- password: "********"
- _csrf : d979ce83-cbc1-49cf-955-418de10caf72
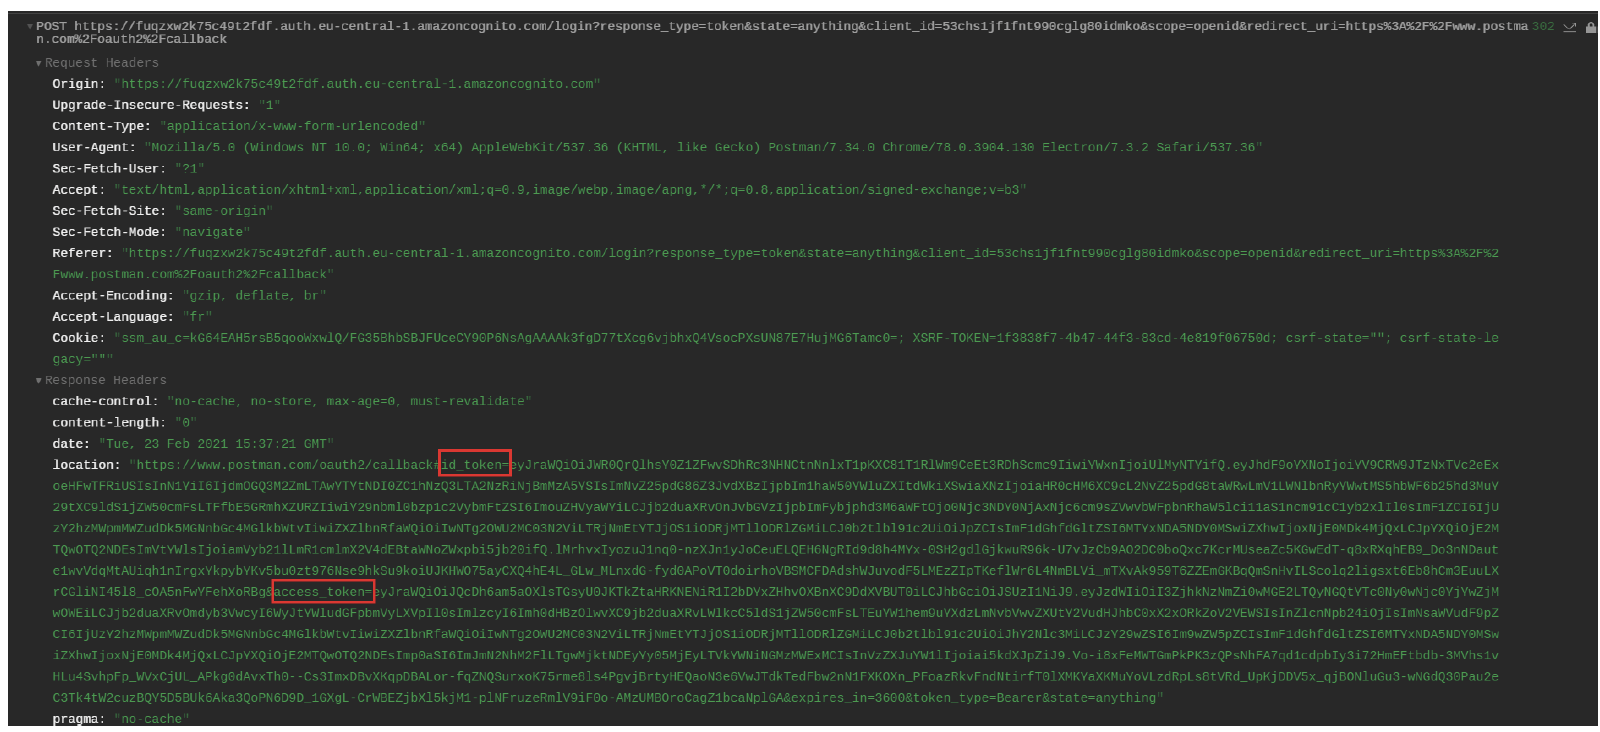
- Get your tokens
You will receive your id_token and access_token in the response’s header (in red below):
2.2.1.2 Open Id – Authorization Code Flow
Note: Here is another standard process that leads to receiving an Id Token. Like the Implicit Flow presented above, it is also available in a browser environment. When possible, it is the recommended process to implement. It is more secure than the ‘Implicit flow’ and provides a refresh token to be used when the given token expires. However, unlike the previous method, it will require the use of a client secret.
Process: To receive an identification token, the application (client) or user will have to make an authentication request to the Amazon Cognito server used by the TIS.
This request requires:
- Username and password (obtained in step 2.1)
- Client Id (see Tip in 2.2.1 if you need to request a client ID)
- Client Secret (see Tip in 2.2.1 if you need to request a client secret)
- A callback URL for your application
Example:
First you will have to submit an authentication request with a ‘code’ response type Parameters: Cognito authorization URL: https://fuqzxw2k75c49t2fdn.auth.eu-central- 1.amazoncognito.com/oauth2/authorize Response Type: response_type=code Application Client Id (see Annex 1): 3661gkmsqil29qtb24rvq3o4tb Your callback URL: https://www.myapplication.com/oauth2/callback
You will receive a redirection to the login page where you may enter your user’s credentials:
GET https://fuqzxw2k75c49t2fdn.auth.eu-central-
1.amazoncognito.com/oauth2/authorize?
response_type=code&state=anything&client_id=3661gkmsqil29qtb24rvq3o4tb&scope=openid
&redirect_uri=https%3A%2F%2Fwww.myapplication.com%2Foauth2%2Fcallback
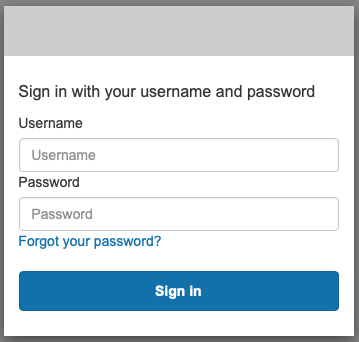
- Validating the credentials will trigger a login request and send back an authorization code to your callback URL. The request will return the authorization code in the response ‘location’ header
GET https://fuqzxw2k75c49t2fdn.auth.eu-central-1.amazoncognito.com/login?
response_type=code&state=anything&client_id=3661gkmsqil29qtb24rvq3o4tb&scope=openid
&redirect_uri=https%3A%2F%2Fwww.myapplication.com%2Foauth2%2Fcallback

POST https://fuqzxw2k75c49t2fdn.auth.eu-central-1.amazoncognito.com/login?
response_type=code&state=anything&client_id=3661gkmsqil29qtb24rvq3o4tb&scope=openid
&redirect_uri=https%3A%2F%2Fwww.myapplication.com%2Foauth2%2Fcallback

Body:
- username: "myLogin"
- password: "********"
Location: http://myApplication/oidc/endpoint?code=849830ee-8418-444d-ac26-8734f3135a95
- Then you may send a token request to the Cognito server, using the authorization code that was provided in the previous step, in combination with your Client Id and Client Secret: The request will return a json with IdToken, AccessToken and RefreshToken
POST https://fuqzxw2k75c49t2fdn.auth.eu-central-1.amazoncognito.com/oauth2/token
Body:
- grant_type: "authorization_code"
- code: "849830ee-8418-444d-ac26-8734f3135a95" --> Given in step 2
- redirect_uri: http://myApplication/oidc/endpoint --> Your callback URL
- client_id: "64v14gunpd9hicf4ufk67tav8j" --> See Annex 1 for Client Ids
- client_secret: "4a8ajiv33tbkvqzt9wa8gs2qe16hb1w863z1yx6g604l0bnqtd0w"
The request will return a json with IdToken, AccessToken and RefreshToken
{"id_token":"eyJraWQiOiJWR0QrQlhsY0Z1ZFwvSDhRc3NHNCtnNnlxT1pKXC81T1RlWm9CeEt3RDhScm
c9IiwiYWxnIjoiUlMyNTYifQ.eyJhdF9oYXNoIjoiY1hjbkxDYjc2alVHd2VOMnlNQ3E1USIsImNvZ25pdG
86cm9sZXMiOlsiYXJuOmF3czppYW06OjQ2Nzc0NjQ2MDE2Nzpyb2xlXC9tYWludGFpbmVyLXVpLWdyb3VwL
XJvbGUiXSwic3ViIjoiN2Y4ZDczZmYtMDBhNi00MjRkLWE3NDctMDY3NGI2MGYzMDlhIiwiYXVkIjoiNjR2
MTRndW5wZDloaWNmNHVmazY3dGF2OGoiLCJjb2duaXRvOmdyb3VwcyI6WyJtYWludGFpbmVyLXVpIl0sInR
va2VuX3VzZSI6ImlkIiwiYXV0aF90aW1lIjoxNjE0MDg4NjIyLCJpc3MiOiJodHRwczpcL1wvY29nbml0by
1pZHAuZXUtY2VudHJhbC0xLmFtYXpvbmF3cy5jb21cL2V1LWNlbnRyYWwtMV9sTkZGaFdlRFkiLCJjb2dua
XRvOnVzZXJuYW1lIjoiai5kdXJpZiIsImV4cCI6MTYxNDA5MjIyMiwiaWF0IjoxNjE0MDg4NjIyLCJlbWFp
bCI6Implcm9tZS5kdXJpZl9leHRAbWljaGVsaW4uY29tIn0.pUNTrgjkB19gpCxFnKQAPTeTprZVzBCIQ6H
bkY8xz0tPzyIg1BgsgoJFyB7xC9vw9t7b3oWheStB08eh9s9v-2Vgh17W0kNWGBM4u-
ZsfdCb7m4LXCjw4L0OIdfjxdXrPnZ2PC_w-D20nLpr01prD3aDIZmjHP2v65WVcziGdn6-ORuYjzLqUJn2-
v3EbcIwZs9i_r4sg4JPFjqYAMrcAi1UIi1WA2wV0zbIvaj3i-XGyTt-
LPthkine6vbCKLwrbEATajWOK9lhyKveSwpsdt34Fhxlw4dsP4hQ5pP5We-pCrW2wKs3-sD8srmhELAgmNYCrWIabipwyKe9g7Q","
access_token":"eyJraWQiOiJQcDh6am5aOXlsTGsyU0JKTkZtaHRKNENiR1I2bDYxZHhvOXBn
XC9DdXVBUT0iLCJhbGciOiJSUzI1NiJ9.eyJzdWIiOiI3ZjhkNzNmZi0wMGE2LTQyNGQtYTc0Ny0wNjc0Yj
YwZjMwOWEiLCJjb2duaXRvOmdyb3VwcyI6WyJtYWludGFpbmVyLXVpIl0sInRva2VuX3VzZSI6ImFjY2Vzc
yIsInNjb3BlIjoib3BlbmlkIHByb2ZpbGUgZW1haWwiLCJhdXRoX3RpbWUiOjE2MTQwODg2MjIsImlzcyI6
Imh0dHBzOlwvXC9jb2duaXRvLWlkcC5ldS1jZW50cmFsLTEuYW1hem9uYXdzLmNvbVwvZXUtY2VudHJhbC0
xX2xORkZoV2VEWSIsImV4cCI6MTYxNDA5MjIyMiwiaWF0IjoxNjE0MDg4NjIyLCJ2ZXJzaW9uIjoyLCJqdG
kiOiI2Mzc1MzBhMC03NmQ2LTQ3OTItYjg5NS1jYjQ0MGFlNjY3YjkiLCJjbGllbnRfaWQiOiI2NHYxNGd1b
nBkOWhpY2Y0dWZrNjd0YXY4aiIsInVzZXJuYW1lIjoiai5kdXJpZiJ9.NJupeYizKbdfnyII3aUx50c9mQ5
pcnZC6swBISz8hbm66Hy5d6gZdefuLUWYWc2cmcMXSr3iCbup2ZYwfNDNfjaPJ3ydXKx8PM4pNlHZOpESmMIGX26CXqToQVUiM28nocvP0VRGYvlr51ouj7AVufTBN
P17hXZOvG6X2
m2bIzP2nHOPpHjNGMGWvXDhCgdHNrSlrR26_rBkYxDURhIn4AR1TfWv_EKSV6S9Wsmk2itWLi4Yl9G9EAx-
EY5GhXGZ7_s598XZcgf8qpEUFjYRXO2k9sbmCGcyny12pNhAUB9LGtgyT9SbHLS_
rRNFHVh7SRWRItEGnD26kkkcIFIw","refresh_token":"
fyJjdHkiOiJKV1QiLCJlbmMiOiJBMjU2R0NNIiwiYWxnIjoiUlNBLU9BRVAifQ.WeFGaQlNoT2nwipnNm0w
WA8DPiXgI1L6XWgJvKaeFQfTLkrTe8BcbWCcCTN7lcAQkj8uL1YzzIYJdzjp_
yusK0nSU3PzrVDQ1a8N1dntrAtBxVbly4Uz0R_AaI8q4sXXMVIqf4sXfVWtLZaJj4YtFBzCM7rhI
wMPGESMs1P4CHtszr0CT4AbUsL8nRRKMY7LEhaWwQ73-
438wEnKAS_dp9XtLf4qg0jihMOtRso175xFa3muFZn7nhDKicIC0w4YL19O0rshTndEPiQ0ehLI3OiLbeED
pHIG_IZ5IUPivIDPzZ7OBgXISTXohRPcGWxwa8zaX3ya3Plk5L-FjjAtg.-
Yn6BMOR5KsxfH8K.OYR3vqzICuClov2_GYiKLH5ysL3POK713cVAtxnn3kSPg3:
2.2.2. Solution 2: Use API Endpoint for System connection (restricted access)
An API endpoint is available to request an Identification token based on the username and password you will receive as a result of the previous step 2.1. This method is recommended for system-to-system communication. Example:
POST https://authentication-api.testing.gdso.org/getIdToken
The example is based on the TIS Testing environment URL (See TIS Environnment for the different URLs).
- Authorization type = HTTP Basic Authentication
- Populate with the Username and Password provided by GDSO
- Token duration < less 1 Day

2.3 Verify the authenticity of the identification token
For some security purpose, practice is to verify the access token with the signing key on the JWT token.
To get the keys :
| Testing | Production |
|---|---|
| Key | Key |
If you need information : https://repost.aws/knowledge-center/decode-verify-cognito-json-token